Having problems with Moodle, GroupWise, Word, or your computer?
Complete the form below for help.
Computer/Moodle/Software Questions
Please complete and submit to have computer/Moodle/software questions answered. Highland will reach out to you via email with an answer, suggestions, or request the device be brought in.
Many informational documents have been created to help you succeed. Please click on the links to open the document.
Information
How to Open Word Docs When Word is Not On Your Computer
How to Open Word Files When Word Is Not on Your Computer
If you do not have Microsoft Word installed on your computer, you can still open Word documents using free online services. These services allow you to upload your Word file and view it directly in your web browser.
Using Google Drive
- In your web browser, go to drive.google.com and sign in with your Google account.
- Click the New button and select File Upload.
- Locate the Word document you want to view, select it, and click Open to upload.
- Once uploaded, double-click the file in Google Drive to open it in your browser.
Using Microsoft OneDrive
- In your web browser, go to onedrive.live.com and sign in with your Microsoft account.
- Click Upload and select Files from the menu.
- Locate the Word document you want to view, select it, and click Open to upload.
- After the file is uploaded, double-click the file in OneDrive to open it in your browser using Word Online.
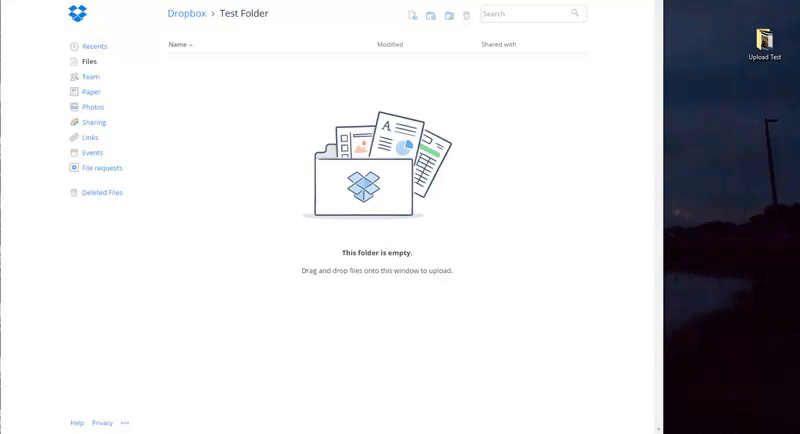
Using Dropbox
- In your web browser, go to dropbox.com and sign in to your account.
- Click Upload and choose Files from the menu.
- Locate the Word document you want to view, select it, and click Open to upload it to your Dropbox storage.
- After the upload finishes, double-click the file to open it in your browser.
- Dropbox also gives you the option to copy the file to Microsoft Word Online for viewing and basic editing.
Tips and Alternatives
These online services are useful when Microsoft Word isn’t available on your device. All three options — Google Drive, OneDrive, and Dropbox — allow you to upload and open Word documents directly in your web browser without installing additional software.
If you need editing capabilities beyond basic viewing, tools like Google Docs or Word Online (through OneDrive) let you edit and save documents in the cloud.
You can also use free desktop applications such as LibreOffice Writer, which can open and edit Word files and is compatible with many formats.
How to Save Word Documents when Word is Not on your Computers
How to Save Word Files (Including When Word Is Not on Your Computer)
This guide explains how to save Microsoft Word documents when Word is installed on your computer and when Word is not available, using free online tools.
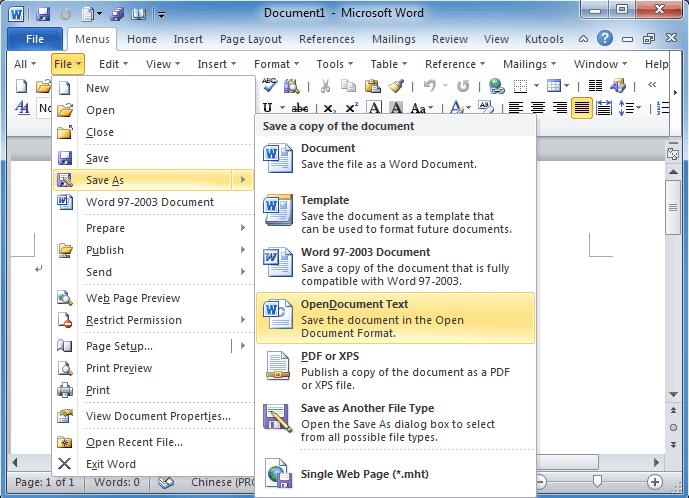
Saving a Word File When Microsoft Word Is Installed
When Microsoft Word is installed on your computer, files can be saved directly to your device.
- Open your document in Microsoft Word.
- Click File in the top menu.
- Select Save As.
- Choose the location where you want to save your file, such as H: drive, Documents, or Desktop.
- Enter a file name and click Save.

Alt text (example):
Microsoft Word Save As window showing file name field and save location options.
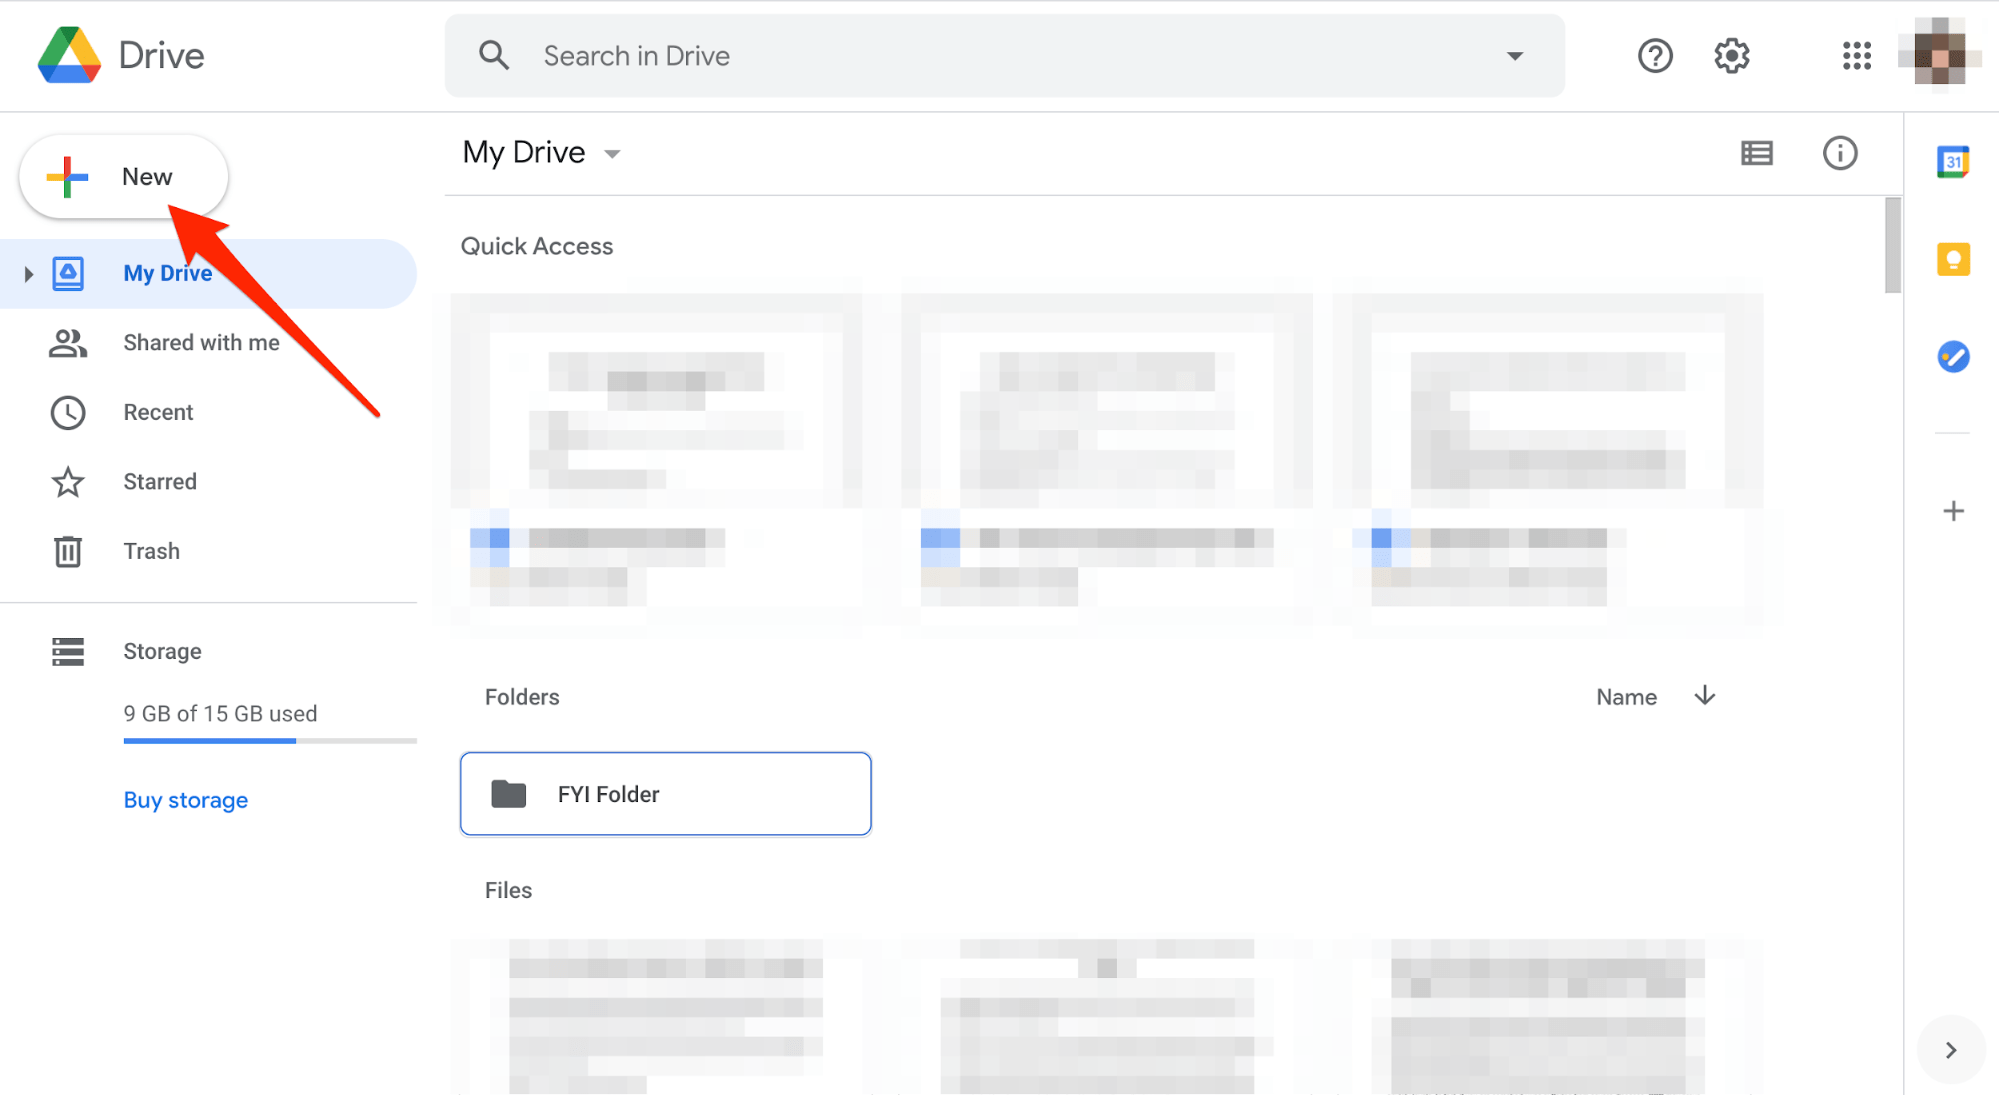
Saving a Word File Using Google Drive (No Word Installed)
Google Drive allows you to upload, open, and save Word files directly in your browser.
- Go to drive.google.com and sign in with your Google account.
- Click New, then select File Upload.
- Choose your Word document and click Open.
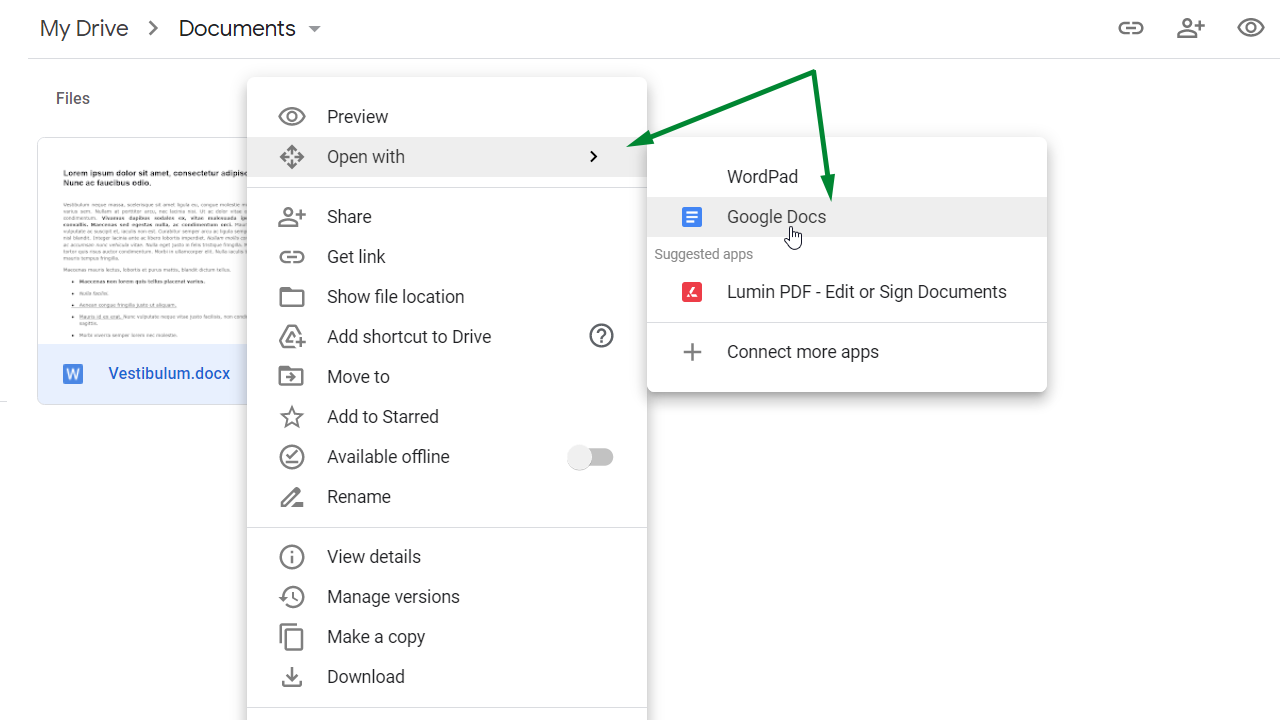
- Once uploaded, right-click the file and select Open with → Google Docs.
- Google Docs automatically saves changes as you work.
Alt text (example):
Google Drive screen showing New button and File Upload option.
Saving a Word File Using OneDrive (Word Online)
Microsoft OneDrive provides access to Word Online, which saves files automatically.
- Go to onedrive.live.com and sign in with your Microsoft account.
- Click Upload, then choose Files.
- Select your Word document and click Open.
- Double-click the file to open it in Word Online.
- Changes are saved automatically to OneDrive.

Alt text (example):
OneDrive interface with Upload button and Word document opened in Word Online.
Saving a Word File Using Dropbox
Dropbox allows you to store and view Word documents and open them with Word Online.
- Go to dropbox.com and sign in.
- Click Upload, then choose Files.
- Select your Word document and upload it.
- Click the file to open it in your browser.
- Choose Open with → Microsoft Word Online if editing is needed.
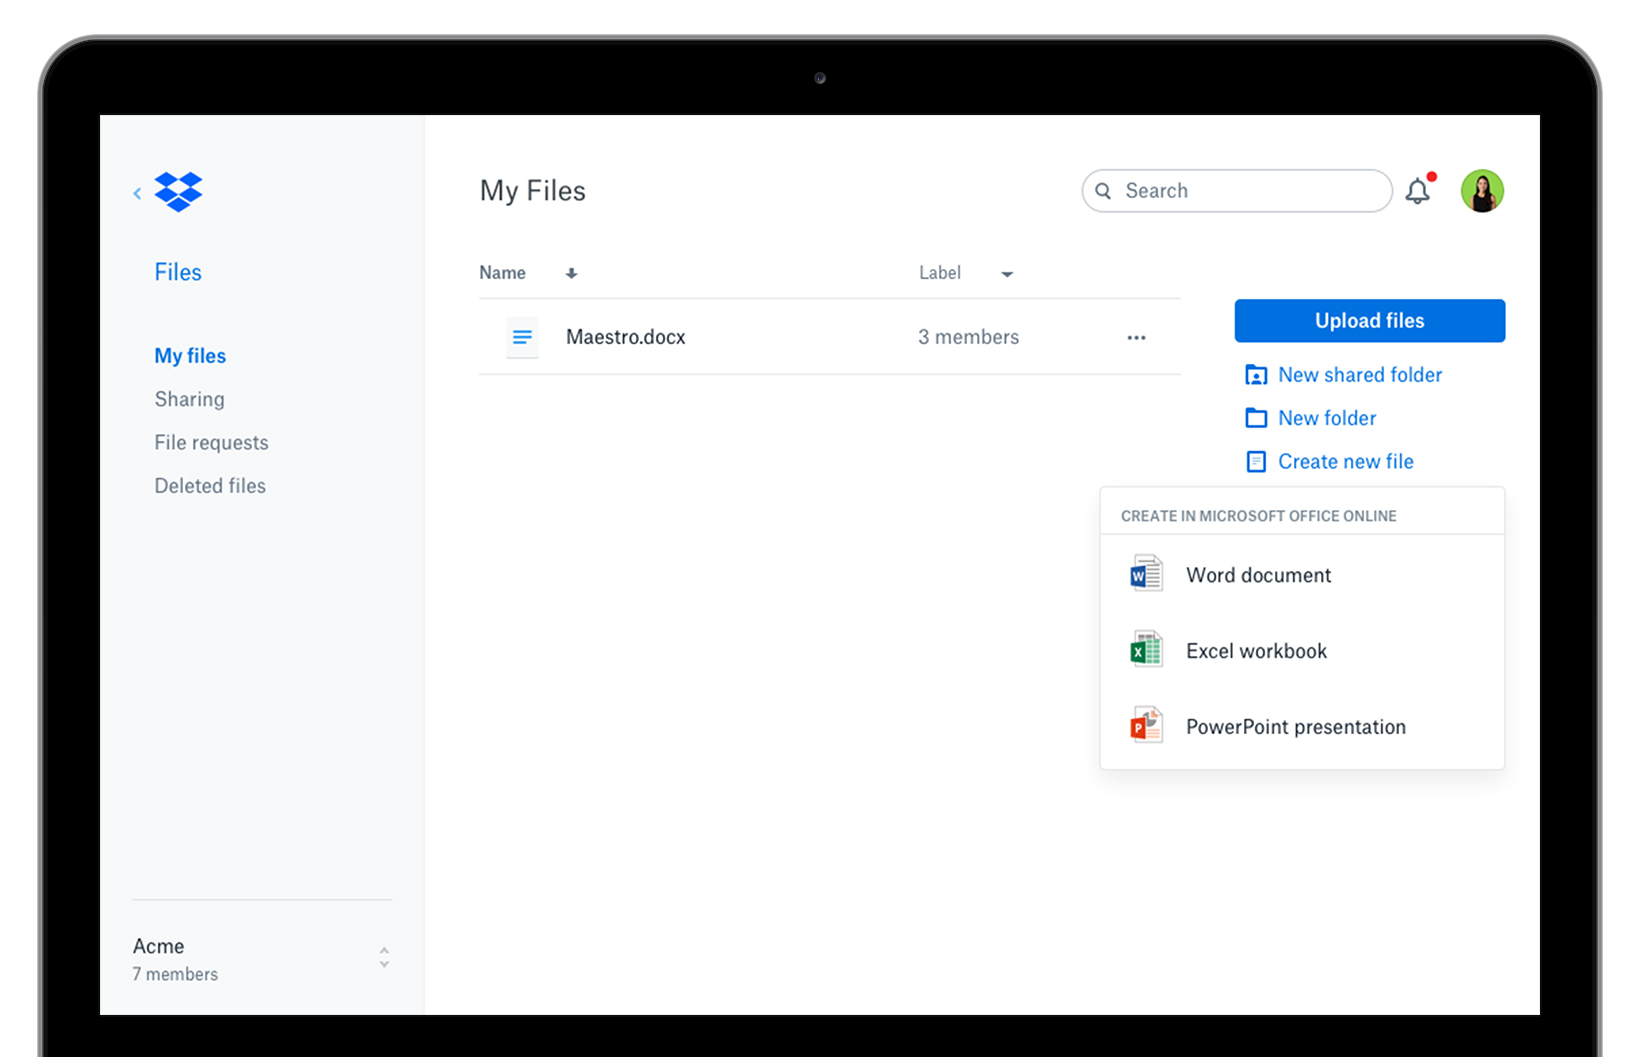
Alt text (example):
Dropbox file list showing uploaded Word document and open options.
Saving Without Word: Important Notes
Online tools such as Google Docs and Word Online automatically save your work. There is no need to click a Save button.
If you need an offline option, LibreOffice Writer is a free desktop program that can open and save Word files.
How to Find your Highland Student ID
How to Find Your Highland Student ID
Follow the steps below to locate your Highland Community College Student ID.
- Go to highland.edu.
- Select LOGIN at the top of the page.
- Click the Sign In button located after the R.O.A.R. button.
- Click the Look up my ID link.
- Enter the last four digits of your Social Security number and the first five letters of your last name, then click Get My ID.
For further assistance, contact Admissions at 815-599-3414. Admissions office hours are 8:00 a.m. to 7:00 p.m.
How To Install & Run Office on a Chromebook
How to Install and Run Microsoft Office on a Chromebook
Microsoft Office can be used on a Chromebook in two different ways, depending on your device. You can install the Office mobile apps from the Google Play Store or use Office Online through a web browser.
Chromebooks do not support the Windows or Mac desktop versions of Microsoft Office.
Using Microsoft Office on a Chromebook
To use Office on your Chromebook, choose the option that works for your device.
If your Chromebook supports Android apps, you can install the Microsoft Office mobile apps through the Google Play Store.
If your Chromebook does not support Android apps, you can use Office Online, which allows you to create, edit, and collaborate on Office files directly in your web browser.
Important Notes
Not all Chromebooks support Office mobile apps. To check compatibility, refer to Chrome OS documentation for systems that support Android apps.
You cannot install Microsoft Office desktop applications, such as Office 2016 or Microsoft 365 desktop versions, on a Chromebook.
How to Install Office Apps on a Chromebook
- Open the Google Play Store on your Chromebook and search for the Microsoft Office apps you want to install.
- Select the app and click Install.
- Once the app is installed, click the Launcher on your Chromebook and select the app to open it.
- Sign in using your personal Microsoft account or the account associated with your Microsoft 365 subscription.
Available Microsoft Office apps include Microsoft Word, Excel, PowerPoint, Outlook, OneNote, and Office Lens.
Signing In and Editing Files
You can view files and perform basic editing in the Office mobile apps by signing in with a free Microsoft account using any valid email address.
If you have a Microsoft 365 subscription, sign in with the account linked to your subscription to access advanced editing features.
How to Open PDF in Reader…not your browser.
Opening PDF Files with Windows 10 and Current Edge or Chrome Browsers
Windows 10 and modern web browsers such as Microsoft Edge and Google Chrome automatically open PDF files directly in the browser. There is no need to download or install Adobe Reader to view PDF files.
If you prefer to use Adobe Reader, it is available for free at https://get.adobe.com/reader/.
Saving a Completed Fillable PDF Opened in a Browser
When a fillable PDF is opened in Chrome or Edge, the Save option does not always preserve entered form data. To save a completed fillable form, use the Print function to create a new PDF.
After completing the form, open the browser menu, select Print, and change the destination or printer to Save as PDF or Microsoft Print to PDF. This will save the completed form with all entered information.
Saving a Completed Fillable PDF in Google Chrome
Google Chrome can save completed fillable PDFs using the Print workflow.
To save a completed fillable form in Chrome, use the Print option and select Save as PDF as the destination. This method does not require Adobe Reader or any browser add-ins.
For detailed step-by-step instructions, refer to How to Save a Fillable PDF on Google Chrome at
https://www.wikihow.com/Save-a-Fillable-PDF-on-Google-Chrome.
Saving a Completed Fillable PDF in Microsoft Edge
To save a completed fillable PDF in Microsoft Edge:
- Select the More options menu in the top right corner of the browser and choose Print.
- Select Microsoft Print to PDF as the printer.
- Click Print.
- Choose a location to save the PDF file and confirm.
The completed PDF will be saved with the entered form data.
Opening PDF Files in Adobe Reader Instead of the Browser
If you prefer to open PDF files in Adobe Reader rather than in the browser, follow these steps.
Ensure Adobe Reader is installed on your computer. It can be downloaded for free at https://get.adobe.com/reader/.
In Google Chrome, open the browser menu and select Settings.
Scroll to the bottom of the page and select Advanced.
Under Privacy and Security, choose Content settings.
Scroll down and select PDF documents, then turn the option On so that PDFs download instead of opening in the browser.
Once enabled, PDF files will download like other file types. Select the downloaded file and choose Open to open it in Adobe Reader. You may also select Always open files of this type.
Important Notes About Chrome and Fillable PDFs
Google Chrome cannot save completed fillable PDF forms using the standard Save option. Always use the Print-to-PDF method described above to ensure form data is retained.
Additional Resources
Information adapted from Google Chrome: Open PDF in Adobe Reader
https://www.technipages.com/google-chrome-open-pdf-in-adobe-reader
To disable Chrome’s built-in PDF viewer, refer to How to Disable Chrome’s Built-in PDF Viewer
https://www.thewindowsclub.com/disable-chrome-pdf-viewer
How to Save a File as PDF
How to Save a PDF File
PDF files can be saved directly from your web browser or from within a PDF viewer. The steps below explain the most common methods using current browsers and Windows 10.
Saving a PDF Opened in a Web Browser
Most modern browsers, including Google Chrome and Microsoft Edge, open PDF files directly in the browser.
- Open the PDF file in your browser.
- Select the Save option, usually found in the browser toolbar or menu.
- Choose a location on your computer where you want to save the file, such as Documents, Desktop, or a shared drive.
- Click Save.
The PDF file will now be saved to your computer and can be opened later without an internet connection.
Saving a Fillable PDF Opened in a Browser
If the PDF is a fillable form and you have entered information, use the Print option to ensure your data is saved.
- After completing the form, open the browser menu and select Print.
- Change the destination or printer to Save as PDF or Microsoft Print to PDF.
- Select Print.
- Choose a save location and confirm.
This creates a new PDF file that includes all completed form data.
Saving a PDF Using Adobe Reader
If you are using Adobe Reader to view a PDF:
- Open the PDF file in Adobe Reader.
- Select File, then Save As.
- Choose a save location on your computer.
- Click Save.
Adobe Reader is available for free at https://get.adobe.com/reader/.
Where Your Saved PDF Files Are Stored
Saved PDF files are typically stored in one of the following locations unless you choose a different folder:
- Downloads
- Documents
- Desktop
- Network or shared drives (on campus)
You can search your computer for the file name if you are unsure where it was saved.
How to Save to the Cloud (Google Drive, iCloud, OneDrive, etc.)
How to Save Files to the Cloud
Saving files to the cloud allows you to access your work from multiple devices and provides a backup in case your computer is lost or damaged. Common cloud storage services include Google Drive, Microsoft OneDrive, and Dropbox.
What Cloud Storage Is
Cloud storage saves your files online instead of only on your computer. Once saved, files can be opened, edited, and shared from any device with internet access.
Saving a File to the Cloud from a Web Browser
Many cloud services allow you to upload files directly from your browser.
- Open your web browser and sign in to your cloud storage account.
- Locate the Upload or New button.
- Select Upload File or File Upload.
- Choose the file from your computer.
- Select Open or Upload.
The file will be saved to your cloud account and available online.
Saving a File to the Cloud from Microsoft Word or Other Programs
If you are working in Microsoft Word or another application:
- Open your document.
- Select File, then Save As.
- Choose your cloud storage option, such as OneDrive.
- Select a folder and click Save.
If your cloud storage is not listed, save the file to your computer first and then upload it through the cloud service’s website.
Saving Files Automatically to the Cloud
Some cloud services offer automatic saving or syncing.
When using online tools such as Google Docs or Word Online, files are saved automatically as you work.
If you use a cloud sync application installed on your computer, any file saved in the synced folder is automatically uploaded to the cloud.
Accessing Your Cloud Files Later
To open a file saved to the cloud:
- Sign in to your cloud storage account from any device.
- Locate the file in your folder list.
- Select the file to open, download, or share it.
Tips for Cloud Storage Use
Use clear file names so documents are easy to find.
Organize files into folders by class or project.
Make sure you are logged into the correct account, especially if you use multiple email addresses.
Moodle
How To Log Into Moodle
How to Log into Moodle and Navigate Moodle
This guide explains how Highland Community College students log into the Moodle learning platform both on campus and off campus, as well as how to access related student systems like email and the student portal.
Logging In on Campus
Step 1:
Enter your username by typing your first initial, middle initial, and full last name.
Example: jndoe (for John N. Doe)
Step 2:
Enter your six-digit birthdate as your password.
Example: 010199 for January 1, 1999
Step 3:
Click Sign In.
Tip: Once logged in, click the My HCC Applications icon for a shortcut to Moodle and other student tools.
Logging In Off Campus
Step 1:
Go to www.highland.edu in your web browser.
Step 2:
Click Login in the site header to reach the student portal.
This student portal provides access to Moodle, GroupWise email, ROAR, and more.
What Moodle Does
Moodle is the learning platform used to access your online coursework. Through Moodle you can:
- See your class announcements
- View assignments and due dates
- Submit homework
- Check grades
Not all instructors use Moodle in every course. If your instructor uses it, your courses will appear after login.
GroupWise (Student Email)
Highland email is accessed through GroupWise. You should check your email daily for course updates and instructor messages.
Student Portal Notes
The student portal also includes:
- ROAR Account — shows personal information and enrollment details
- Course Schedules
- Financial Aid and Billing
- Ability to change your password
The credentials used for the student portal are the same username and password used for Moodle access.
Support and Help
If you are unable to log in or need password assistance:
Contact the Highland ServiceDesk: 815-599-3628 or its@highland.edu
Reset your password using the portal’s Forgot Password link
Moodle Video Assignments
Movie Assignments in Moodle
Most students find it easy to use their smartphones to record videos. Moodle also makes it easy to create assignments that allow students to upload video files. The following information outlines important considerations when assigning a movie or video project.
File Size Limits
Moodle has a file upload limit of 50 MB per assignment. When creating or editing a Moodle assignment, instructors may need to manually set the maximum upload size to 50 MB.
A short two-minute video recorded on an Android phone can exceed 200 MB. In these cases, video compression is required before uploading.
Video Compression for Android Devices
Video Compress is a highly rated and easy-to-use video compression app available for free in the Google Play Store. The app provides multiple compression options.
A typical setting of 854 × 480 resolution at 480 dpi will usually reduce the video file size below 50 MB while maintaining acceptable quality. Additional compression may be required if the file size still exceeds the upload limit.
iPhone Video Uploads
Videos recorded on iPhones are typically under 50 MB and usually do not need to be compressed before uploading to Moodle.
Uploading from Mobile Devices
Accessing Moodle through the Highland mobile app does not allow Android users to open the file manager needed to upload files.
To upload a video from an Android phone, students must:
- Open Google Chrome
- Navigate to highland.edu
- Log in
- Select Moodle
- Upload the file through the assignment using the web browser
Alternative Submission Options
There are two alternative methods for submitting videos if direct upload is not possible. Both options require the instructor to create a Moodle assignment that accepts online text submissions.
Option One: Students upload the video using the YouTube app, set the privacy to “Anyone with the link,” and paste the video link into the Moodle assignment.
Option Two: Students upload the video to cloud storage such as OneDrive, iCloud, or Google Drive, then share the file. Instructions for sharing videos can be found in each cloud service’s help section. The shared link is then submitted through the Moodle online text assignment, just like the YouTube option.
Moodle Forum Subscriptions
Moodle – Subscribing to a Forum
In Moodle 2.6, students have the ability to subscribe to a forum within a course. Subscribing to a forum sends an email notification each time someone posts to that forum.
Each instructor can choose one of four forum subscription settings for their course.
Optional allows students to choose whether they want to subscribe.
Auto initially subscribes students to each forum, but students may unsubscribe if they choose.
Forced permanently subscribes students to the forum with no option to unsubscribe.
Disabled does not allow forum subscriptions.
Steps to Subscribe to a Forum
- Log in to Moodle and select the course containing the forum you want to follow.
- On the left side of the screen, locate the Activities section and click Forums.
- A list of forums for the course will appear. Click the forum name link for the forum you want to subscribe to.
- The selected forum will open. On the left side of the screen, locate the Administration section.
- Under Forum Administration, click Subscribe to this forum. You are now subscribed and will receive email notifications when new posts are made.
At this step, you may also choose to unsubscribe from the forum if the instructor’s settings allow it.
Moodle Turn It In Assignment Submissions
Handing in a Turnitin Assignment in Moodle
This guide explains how to submit a Turnitin assignment through Moodle.
Before You Begin
Complete your paper, such as a document typed in Microsoft Word, and save the file.
If you are on campus, save your file to the H: drive.
If you are off campus, make note of the folder where your file is saved, such as My Documents or Desktop, so you can easily locate it during upload.
Submitting Your Assignment
- On your Moodle course page, locate the Turnitin assignment in the center column and click the assignment name. Turnitin assignments can be identified by the icon with a circular red arrow.
- The assignment description page will appear and display the due date and the Post Date, which indicates when grades will be available if the assignment is graded. To submit your paper, click Submit Paper in the bottom right corner of the page.
- On the Submit Paper page, choose one of the following upload options. Option A: Drag and drop your file into the area labeled “Drag and drop files here” in the center of the page. Option B: Click the Add file button located in the top left corner of the files box to open the file picker.
- If using Option B, continue by selecting Upload a file from the menu on the left side of the file picker. Click Choose file to open your computer’s file browser. Locate your file, select it, and click Open. Then click Upload this file to complete the upload.
- Once your file appears in the Files box, complete the submission process by entering a title for your assignment in the Submission Title field, selecting the checkbox to confirm that the work is your own, and clicking Add Submission.
- You will briefly see a message indicating that your submission is being uploaded to Turnitin. After processing, a digital receipt page will appear confirming your submission. You will also receive a confirmation email in your Highland email account. Save this email for your records.
After Submission
After your paper has been checked for originality, a similarity percentage will appear in place of the word “Pending” in the similarity column. You can click the percentage to view your paper and review any sections that may require additional citations.
If the assignment is graded, you can view your instructor’s feedback by clicking the paper title once grading is complete.
Zoom
How to log into a Zoom meeting
How to Begin Using Zoom (Students)
Zoom is used at Highland Community College for online classes, virtual meetings, and remote support services. This guide explains how students can get started with Zoom.
What You Need Before Using Zoom
To use Zoom, you will need:
- A computer, Chromebook, tablet, or smartphone
- An internet connection
- A microphone and speakers (or headset)
- A webcam (recommended but not always required)
Zoom can be used through a web browser or by installing the Zoom application.
Creating or Accessing a Zoom Account
Students do not need to create a personal Zoom account to join a meeting. You can join most Zoom meetings using a meeting link provided by your instructor.
If you choose to create a Zoom account, you may sign up using your email address or sign in using an existing Google or Microsoft account.
Joining a Zoom Meeting
- Click the Zoom meeting link provided by your instructor.
- If prompted, choose Open Zoom Meetings or Join from Your Browser.
- Enter your name if requested.
- Select Join Meeting.
You may be asked to allow access to your microphone or camera. Select Allow if you plan to speak or be seen during the meeting.
Installing the Zoom App (Recommended)
Installing the Zoom app provides the best experience and access to all features.
- Go to https://zoom.us/download.
- Download the Zoom Client for Meetings.
- Open the downloaded file and follow the installation instructions.
- Once installed, open Zoom and join your meeting using the provided link.
Audio and Video Settings
When joining a meeting, you may be asked to choose audio options.
Select Join with Computer Audio to hear and speak during the meeting.
Use the microphone and camera icons to mute or unmute yourself and turn your camera on or off.
During a Zoom Class or Meeting
During a Zoom session, you may be asked to:
- Mute your microphone when not speaking
- Use the chat feature to ask questions
- Raise your hand using the reactions menu
- Share your screen if instructed by your instructor
Follow your instructor’s guidelines for participation.
Leaving a Zoom Meeting
To exit the meeting, select Leave Meeting in the lower right corner of the Zoom window.
Troubleshooting and Help
If you have trouble joining or using Zoom:
- Make sure your device audio and camera settings are enabled
- Check your internet connection
- Restart the Zoom app or refresh your browser
For additional help, contact Information Technology Services at 815-599-3628.
Online Courses
For more information about online and hybrid course offerings, visit the Searchable Schedule.
Y1, Y2, and Hybrid Courses-what are they?
Highland offers many courses in several modalities to fit the needs of students. Courses entirely online are Y1 sections, courses requiring minimal time on campus are sections Y2, and courses requiring some time on campus are sections HB. Highland offers Associate of Arts and Associate of Science degrees almost entirely online. Many students take a combination of face-to-face, hybrid, and online courses during their studies at Highland. At Highland, these courses may be determined by their section designations. “Y1” sections are strictly online-you will not need to come to campus at all. “Y2” sections may require several trips to campus, possibly for a single face-to face class meeting or to take tests on campus in a proctored environment. To take a course online, you will need a modern Internet-connected computer and some commonly available software. Hybrid sections are designated HB. These courses make use of the Internet for any or all of their course content-when and how much is up to the instructor. Classroom attendance is reduced but not eliminated; and hours of attendance may be flexible. If these details are a concern, you should contact the instructor or someone in his or her department before registering. Success in learning online requires a self-motivation and direction that may not be necessary for a face-to-face classroom. OASIS (Online Assessment System for Internet Studies) available at http://www.ilcco.net/oasis/to help you determine if you are ready for online learning. OASIS consists of two parts, study skills, and learning styles. While online courses are convenient, many students find they require more time than face-to-face, but the student’s learning experience may be more rewarding.
VM Sections
VM (virtual meeting) sections were approved for Fall 2020 semester. VM section code would indicate that class will meet at a regularly-scheduled time whether it be virtually or face to face. Instructors who prefer a hybrid approach may consider a combination of Zoom and face-to-face class meetings. A portion of students would meet f2f while other students would attend class via Zoom. Days could be alternated so that all students could have a f2f experience if desired, yet classroom capacity would be limited. Class times may be synchronous or asynchronous, depending on instructor’s requirements. There are two types of VM sections, one that is completely virtual and the other is class virtual with on-campus meetings.
Online Course Complaints
For information regarding online course complaints, please go to https://highland.edu/student-information/complaint-process/
Minimum Computer Requirements*
- Processor: Intel i5 / AMD Ryzen 5 or greater
- Memory: 8 GB RAM, 16 GB or greater recommended.
- Storage: 500 GB hard drive minimum; solid state (SSD) preferred.
- Wireless: Dual band 2.4/5.0 GHz Wi-Fi; WiFi 6 preferred.
- Web camera and mic
- Operating System: Windows 11 / MacOS
*some courses will have additional requirements, check with course syllabus
Office 365, one license free for faculty and students
For more information regarding Microsoft Office 365, please visit the following page.